

3D on the cheap(ish)
/3D on the cheap(ish)
I'll preface this post with the disclaimer that this isn't a good way to shoot stereo and I wouldn't shoot anything I was getting paid to deliver with this setup. But I love experimenting and right now I'm looking for ways to independently shoot high quality stereo images that doesn't involve thousands and thousands in equipment rentals, insurance out the wazoo, and all the accompanying personnel to make it go.
For stereo acquisition, using DSLR's in the most cost effective beamsplitter we could find was certainly an avenue worth exploring but I'll say it again, a less than ideal way to get there.
Peter Clark from Attic Studios and I did these stereo tests with Canon 5D's 3 or 4 months ago and I've been meaning to write this post ever since. Sort of like these NAB interviews that are sitting here in a Final Cut bin ;(
The company who provided the beam splitter, 3D Film Factory, wrote this blog post awhile back, publishing a truncated version of our findings. This post will attempt to go a little deeper into how we did it, what worked, and what didn't.
Here's how it all breaks down -
These are the problems with using DSLR's for stereo acquisition -
No way to genlock them, or in other words, force both sensors to begin scanning at the exact same moment in time. If you don't have genlock, you don't have 3D. Temporal offsets will kill the stereoscopic illusion so quickly derails any attempts to make 3D. Also, no timecode. While this isn't necessarily a deal breaker, it certainly makes syncing the left and right eye images together a heck of a lot easier. But as we discovered, there are some practical workarounds.
These DSLR cameras are notorious for their Rolling Shutters. It's bad but only slightly worse than the Red One which was and still is to a certain extent, very commonly used for 3D. I basically approached using the Mark 2's in stereo like I would for Red One's - just make sure the sensors are both scanning in the same direction which means mounting the reflected eye camera from the top instead of the bottom (more on that in a bit).
The goal of this test was to try and use somewhat readily available or cheaply rented articles and to use software that most people are already using such as Final Cut Pro and Plural Eyes, without having to spend a bunch of money on custom plugins and codecs. Of course in the end, all of this bric-a-brac added up to a hefty sum and for all of the headaches and work arounds needed to make it function, in my mind it's not worth it. You're better off sweet talking someone with deep pockets into financing your "dream" 3D project and just renting a couple of Sony F3's and an Element Technica Pulsar. There's a reason we have pro gear in this business. Time saved not trying to make the hoopty rig go is time spent crafting the images the client is paying for.
Here's what we used to make this happen:

2x Canon 5D Mark 2's with Battery Grips so to avoid taking the cameras out of the rig to change batteries.
AC Adapters would have been better but we didn't have them. Once the cameras are in, don't touch 'em! Aligning the Film Factory rig is a brutal chore. Make sure to record sound because this workflow needs audio tracks on both cameras to work.
1x 3D Film Factory Beamsplitter Rig.

Gotta make sure that mirror is at 45 degrees. That's a great place to start.
I'm not sure which Film Factory Rig we had, might have been the Mini. The rig itself is made up of readily available 80/20 Aluminum tubing, I would guess about 5 or 600 hundred dollars worth which means there's a significant margin on the rig if you were to buy one. While apparently an alignment plate does exist that will allow you to adjust pitch, height, and roll so as to match the position of one camera to the other, we didn't have it for this test. Without those adjustments, you're really up against the wall as far as your alignment goes. I was able to approximate an alignment using video overlays but there's not way to correct for foreground to background vertical offsets like using Z, Pitch, and Roll adjustments on an Element Technica rig. So in other words, if you do find yourself working with the 3D Film Factory, make sure to get the "Specialty Plate".
2x Canon 50mm Lenses set to manual.
A little wider would have been better but once again, this is what we had to work with.
2x Pocket Wizards with Sync Shutter Cables. Very important.

Here's where we got theoretical - As I mentioned, one of the main issues with using DSLR's for stereo is that there is no way to genlock them together. In order to create the illusion of binocular vision, the sensors on both cameras we're using need to start scanning at exactly the same moment in time. It's like syncing cameras together for live tv, all your AV devices need to be hitting on the same cylinder so that when the switcher goes to that camera, it's an instantaneous switch and not a frame or two or black or garbled signal while phase is being found. DSLR's have no ability on their own to be locked to an external signal but there's a device called a Pocket Wizard that's used to lock the shutters of multiple cameras to a strobe light. It works great for shooting stills so we thought that if we used the Pocket Wizard to shoot a few stills while video was rolling, theoretically that would align the shutters within the level of tolerance. After trying it a few times, we found that to be the case. It does work quite well actually and all the stereo video we shot with the Mark 2's had zero temporal sync issues.
1x Heavy Tripod Legs to get the rig on to. It ain't light so a set of standard Ronford Bakers or heavy duty Sachtlers.
1x Consumer grade 3DTV. We had a Panasonic Viera with Active Shutter Glasses. I was hoping to be able to monitor the 3D images in real time on this display but there were some snafu's.
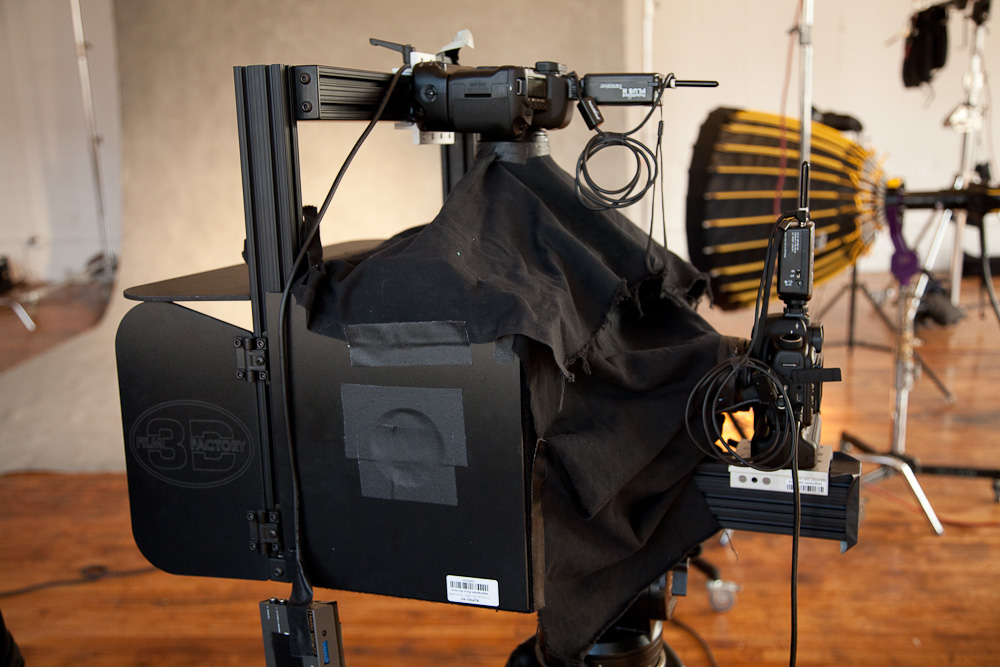
Here's the rig up and running. We had to use duvetyne scraps and black gaffer to make it light tight. Looking good.

2x Blackmagic HDMI to SDI Mini Converters. I needed these to convert the camera's HDMI out to SDI for use with the new AJA Hi5 3D "mini muxer". It takes 2 discrete SDI signals (i.e., left and right eye) and muses them into a single 1920x1080 raster that can be output in side by side, interleaved, etc for monitoring in stereo. This is a sweet little box and it would have been perfect if the Mark 2 didn't output some funky, irregular video signal. I couldn't get the box to take the converted signals for more than a few seconds. We tested with other SDI sources though and it works great so it was on to Plan B.
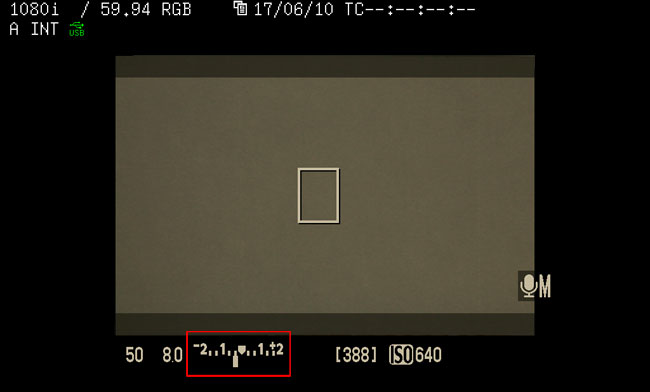
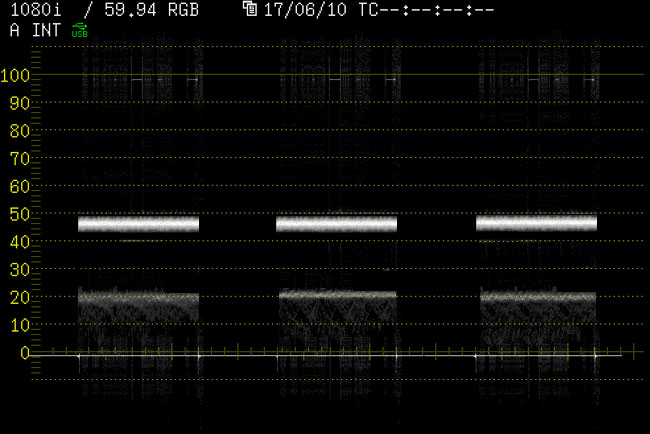
1x Leader LV5330 multi SDI monitor.
This is probably the most expensive thing used on this test and is certainly not your typical "indie" tool. Because the muxer didn't like the Mark 2 signal I had no way of monitoring stereo in realtime but with my scope I knew that I could at least align the 2 cameras in the rig to the ZERO position. In 3D, you have to start from zero, both cameras must be seeing approximately the same frame and from there you can separate them to create interocular distance, thus creating stereo images. The Leader can take 2 SDI sources and freeze frames so what I did was set the left eye position, froze the frame, and then switched to the right eye and adjusted the position until it matched the overlay of the other camera. A crude alignment but a successful one. If you can't monitor both eyes simultaneously, I don't how else you would align other than the freeze frame method. The alignment was incredibly frustrating and involved wedging and shimming, sliding and taping. Basically creating a Frankensteinish like creation just to get a semblance of an alignment and this was only for the foreground. Fortunately the deepest thing in our scene was only about 25 feet from the lens so we were in the margin or error. I could tell by looking at it though that there were major offsets and if we had been outside with deep backgrounds, we would have been in trouble.
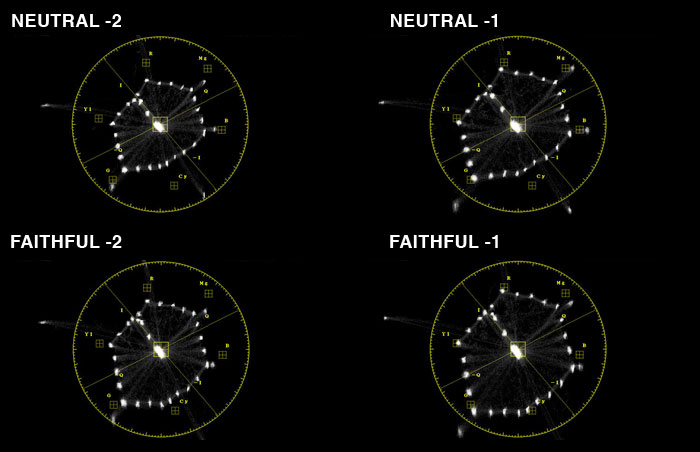
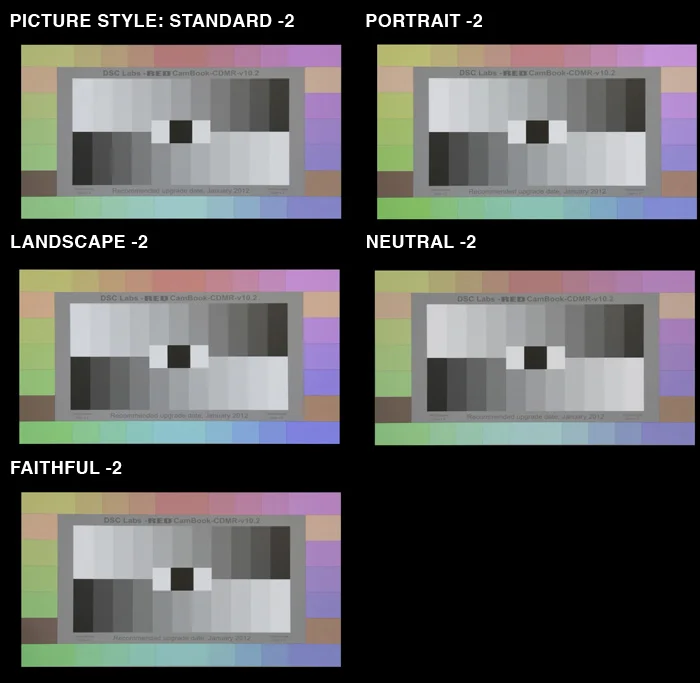
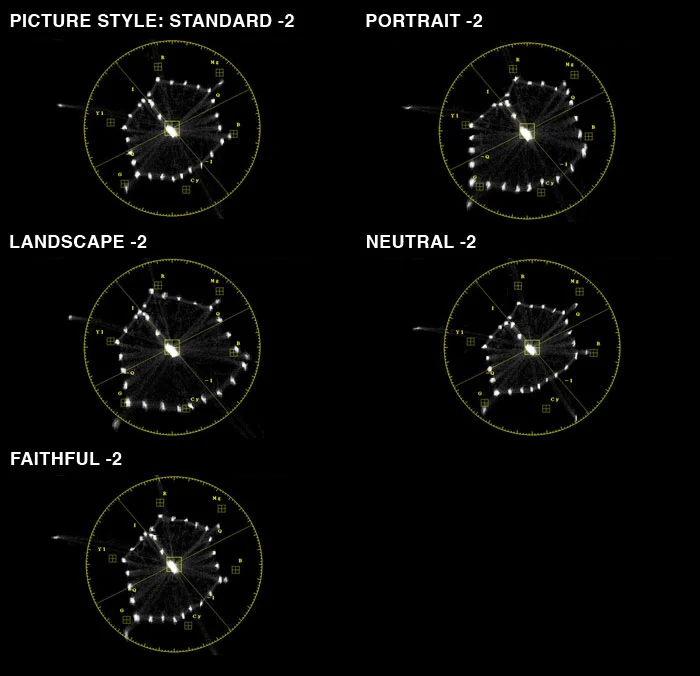
While I was at, I also used the scope to match the picture profile of one camera to the other. There's always a lot of green/magenta shift when going through the beamsplitter mirror so if you have the means to correct for it at the source, it's always a good idea. I think for this I used my usual preferred Picture Style - Faithful with Contrast all the way down and Saturation down a few points. I then used the White Balance and Tint controls to dial in the best match I could create for the pair.
Once I had Zero, I measured the lens to subject, lens to foreground, and lens to background distance. I then used the iPhone app, IOD Calc to find an Interocular distance that would put me safely within this range. Because there was no way to Converge, or tow-in the cameras without ruining the alignment, I just left them in Parallel knowing that I could always adjust the convergence in post. I set my IO distance and we were ready to shoot. Because there was no way to monitor in 3D we just kind of winged it and hoped for the best.

POST:
1x license of Final Cut Pro / Compressor.
We wanted to see stereo bad so after shooting a few tests, we took the Left and Right eye images into Compressor and made ProRes files making sure that the audio recorded to the cameras was embedded in the new files.
1x license of PluralEyes.
Next we imported all of the transcoded material into FCP, and set up a timeline for PluralEyes sync. Because the audio is the same on both left and right eye images, PluralEyes does a frame accurate sync and from there it's only a matter of getting them into a stereo pair somehow.

There are a lot of ways to do this but I didn't want to spend any money on plugins so I thought how can we easily create a Side by Side 1920x1080 video right in FCP. It's actually incredibly easy. PluralEyes put the 2 image streams in 2 separate video tracks and synced them together so they're on the same frame. Now take the left eye video, in the Viewer go to the Motion tab, go to Distort and then in Aspect Ratio type in 100. You now have an anamorphically squeezed one half of a stereo video signal. You need to get it on the left side though so in Center type -480. This will place it on the left edge of frame and it occupy exactly 50% of it. Now with the Right Eye, first do a little Flip Flop Effect to get it in the right orientation. Any time you're dealing wtih mirrors there is always image inversion. In the right eye video's parameters do the same thing but in Center type 480 instead of -480. You now have a stereo pair in your timeline. You can't really make screen plane adjustments to them, at least not easily, and in order to edit them, they would need to be output again so that 2 images get baked into the same raster. But it does work and if you have FCP, you don't need anything else.
1x Matrox MXO2 LE.
Now the fun part - Watching your stuff in 3D. In order to watch stereo from your timeline, you've got to have some sort of external hardware that will get the video signal off you computer and into an HDMI or SDI cable. I've had the Matrox box for a few years and too my delight, they keep adding functionality to it free of charge all the time. They recently added 3D support to the HDMI output so if you have Side by Side media in FCP, the Matrox can send it to a HDMI receiver like a 3DTV and flag the signal as stereo so that it knows how to display it. This worked great with the DIY Side by Side's I made in FCP and we were watching stereo from my laptop in realtime. Awesome.


Model: Andrea Grant
That's it in a nut shell. It's always fun to experiment with this stuff. Like I said, this wouldn't be my first choice but in a pinch, you could make it work.
Peter will be publishing the stereo video from these tests online at some point. I'll post when I have it.


 © 2021 Bennett Cain / All Rights Reserved /