

Glyph Triplicator Review
/Glyph Triplicator Review
Let me preface this post by saying that I'm not and have never been in the business of hocking wares on this site. This is why it's not littered with banner ads, product name drops, "gear stores", etc. I have no need to monetize my content and have been doing this for about 4 years now solely for the purpose of sharing my honest opinion on equipment and products that I work with professionally. The minute I lose my ability to be forthcoming - to praise things that I like and be fairly critical of things that I don't, I have zero interest in continuing this site. Because of this, I occassionally get to be involved with beta testing and early releases of upcoming products and services. One of the products I've been working with lately is the Glyph Technologies' Triplicator.
What it does -
This box sits between your computer and up to 3 eSata connected external hard drives. Upon initializing the drives with the Triplicator, these 3 volumes now show up on your desktop as a single volume. The speed of copying data to this new volume is approximately half the time of what it would be if you copied to each volume individually. So in other words, the time it would take you to copy to 1 drive and a backup drive can be done in roughly the same time as if you were to copy to just 1 drive. Needless to say, this comes in pretty handy.

When I first got my early adopter model I felt like this was something that had a lot of potential but posed some practical problems. The main issue was that whenever the power on the box recycled, the drives attached to it had to be re-initialized, i.e. completely erased. This meant that if you started a volume in the morning and the company moved, you of course have to power everything down. When you tried to re-mount the drives and continue copying to them with the Triplicator, you would have to erase them first and start all over. This to me was totally counter intuitive and prevented me from using the product to effect. My contact at Glyph Technologies assured me that the ability to re-mount drives was in the works and after sending my Triplicator back to be upgraded, I can now report that the new firmware and functionality is a success and you can use the Triplicator exactly how you would want to - start a volume, put it away, pull it back out again and get back to work. All the drives are perfect clones of one another and everyone gets their hard drive at the end of the day without having to wait around for it.
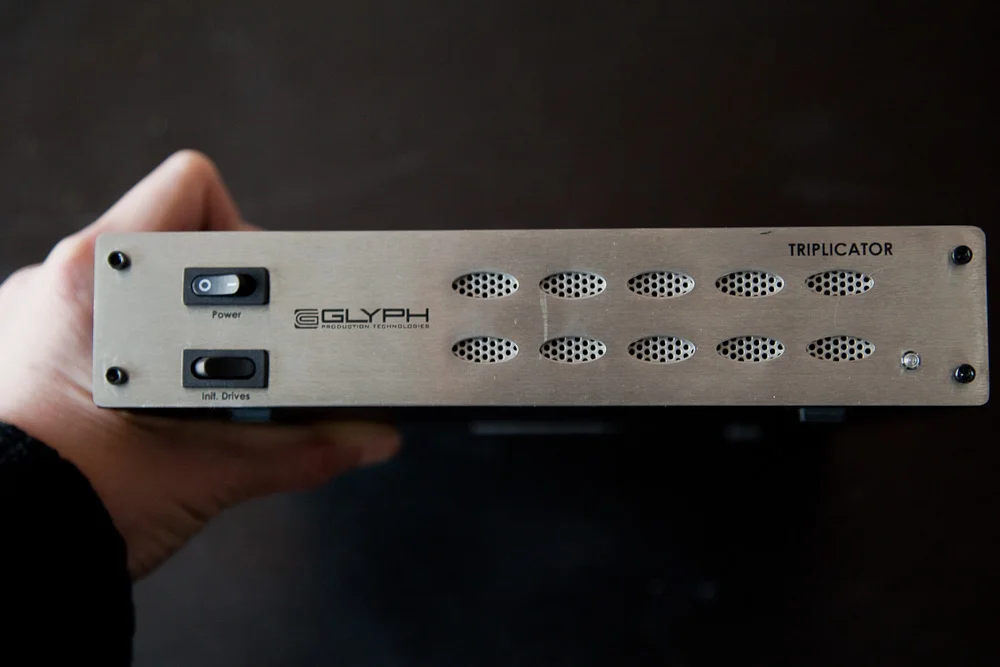
Here's what's new on the upgraded box -

Below the Power switch is this new Init. Drives switch which is the only way to initialize the drives and create the Triplicator volume. This button only works to create a volume with fresh drives so once it's created, there is zero risk of you accidentally re-formatting your drives with this button.
Here is the procedure for working with the Triplicator -
1. Label your drives 1, 2, and 3. There are corresponding 1, 2, and 3 eSata connections on the back and drive 1 must correspond to port 1, etc if you want to be able to remount the drives. Very important.

2. Turn on hard drives and plug them into the cold Triplicator via eSata. Connect the cold Triplcator to your computer with preferred interface and then power it on.
3. The Blue LED on the front of the Triplicator telling you it's ready to initialize. Click the Init. Drives button beneath the Power switch.
4. The Red LED will flash once for every drive attached. If 3 drives are attached it will blink at you 3 times. Once it's figured out how many drives, a warning will pop up on the desktop saying that the volume is unreadbale and it will ask you if you want to initialize.
5. Click Yes and the volume will pop up on your desktop. Now go to Disk Utility and format it in your preferred file structure, usually HFSJ.
6. Copy away to the new volume with speed and simplicity. The connected drives are all perfect clones of one another.
7. To unmount, simply drag the volume to the trash like any other external volume. To remount, cable the drives to their correct ports on the cold Triplicator, turn them on, connect the Trip to you computer and then fire it up. It will think for a moment and then the Trip volume will pop back up on your desktop. Rinse. Repeat.
So how fast is it?
Results from Glyph's in-house test -
"I just did some tests with three drives through the Triplicator, compared to the same three connected FW800 to my Macbook Pro. When connected through the Trip, a 2.47GB finder copy takes 56 seconds. When these drives are connected FW800 in a daisy chain, I set up three simultaneous finder copies and it took 2:20. Triplicator is more than twice as fast.
Same test with 6GB data set takes 2:33 through the Triplicator. Three simultaneous finder copies of 6GB takes 5:30. Again Triplicator is more than twice as fast."
My own tests 100% confirm this. The file transfers happen twice as fast with the Triplicator.
How does it work?
This is obviously Glyph Technolgies' proprietary magic but it functions similar to a RAID controller and is based on RAID 1 technology. That's all I know actually but what's most important is that it works and it makes your job easier.
I received no compensation for this review and I paid for my device just like everyone else. I was happy to be involved with this beta test and to get to know some folks at Glyph. I think this is a supremely useful, time saving piece of hardware and I recommend it to anyone who has found data management to fall under their jurisdiction. I'm pretty sure the list price is around 400 USD.


 © 2021 Bennett Cain / All Rights Reserved /