DIY Litepanels Accessory

487072.jpg

DIY Litepanels Accessory

In my opinion, the Litepanels MiniPlus Flood is one of the best lights on the market. It's small and endlessly mountable, very rugged, versatile power options, dimmable with minimal color shift, and pretty darn punchy for a small unit. You can get the complete kit that lets you mount it to a camera or on a stand for about $1000, not cheap but worth every penny. I've found one of the ways I most often use this light is as a backlight or rim light for interview shots. The light isn't quite big and punchy enough to use as an effective key source but it's very even and looks great on the side of someone's face. Because it's a relatively small source though, it needs to be softened up before it starts to look really good. The diffusion gels that come with these lights, because they fit directly on to the face, don't really have much of a softening effect. They'll reduce the quantity and smooth out the beam a bit but if you want to turn this into a genuine soft source, you need to get some space between the head and a larger diffuser. You can set another stand and put a frame of diffusion on it but that means more crap on the floor and if you're traveling light, your stands are probably tied up holding lights. Here's a little DIY solution I came up with to turn this light into a softer source right at the head using a couple of cheap, readily available parts. 

Here's what you need:

parts.jpg

-Dremel Drill (hopefully you don't need to go buy one to make this accessory)

-A couple of 1/4-20 Hotshoe Adapters, $12.95, you'll cannibalize the top nut

-Lowel Tota 10"x12" Gel Frame, $22.95

-6" 1/4-20 Machine Screw, not pictured here, you can get these for about 45 cents 

1. Drill a hole into the mounting arm on the Tota Frame big enough for the 1/4-20 screw to go through

2. Cut the head off the 6" Machine Screw

3. Remove the top nuts from the Hotshoe Adapters

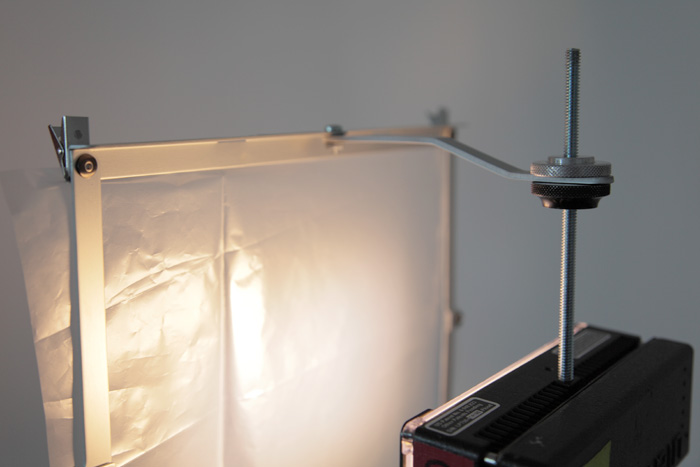
4. Insert the screw into the 1/4-20 receiver on the Litepanels Miniplus unit

5. Put the rest of it together as pictured below and you have a quick and easy way of turning this light into a nice, soft source. It especially makes a pretty rim light in interview situations. 

lp1.jpg
lp3.jpg
lp2.jpg

Active Diffusion ?

Active Diffusion?

Sorry to be a re-posting maniac today but this is just awesome...

If you read this site, you probably follow The C47 as well so you've already seen this but thanks to Jem for sharing and allowing the vid to be embedded. I can't believe no one else who was doing video coverage at the show featured the Active Diffusion. Why is this a film/video lighting product? The household and business applications seem tremendous. I'd love to have this stuff on every window in my apartment! $400 for the 2x2 piece is very affordable. I wonder how durable this stuff is though.. I heard you can't put a hot head behind it, cool sources like LED's and Fluorescents only at this time. 

ZYLIGHT

Light Loss and Mired shift values for Gels and Diffusion

Light Loss and Mired shift values for Gels and Diffusion

Surprisingly, you've really got to dig online to find basic cinematography information like stop values and Mired shifts for Gels. The Lee Filters website has these figures but trawling through their catalogue to find them is slow going so I thought I'd post it all here. While this is maybe not so useful when scrambling around on set, I like to refer to this info when designing lighting plots or trying to put together an equipment or expendables order.

LIGHT LOSS FOR COMMON DIFFUSION TYPES:

White Diffusion "216": 1 1/2 stops
1/2 White Diffusion "250": 3/4 stop
1/4 White Diffusion "251": 1/3 stop
1/8 White Diffusion "252": 1/4 stop

Opal "410": 1/2 stop
Light Opal Frost "420": 1/4 stop
Hampshire Frost "253": 1/4 stop
Heavy Frost "129": 2 stops

Grid Cloth "430" or Silent Grid Cloth: 2 1/2 stops
Light Grid Cloth "432" or Silent Light Grid: 2 stops
1/4 Grid Cloth "434" or Silent 1/4 Grid: 1 stop

Full Tough Spun "214": 2 1/2 stops
1/2 Tough Spun "215": 1 1/2 stops
1/4 Tough Spun "229": 3/4 stop

Artificial Silk: 1 2/3 stops
1/4 Silk: 2/3 stop
China Silk: 1 stop

Unbleached Muslin: 2 stops
Bleached Muslin: 2 stops

Heavy Diffusion:
Muslin, Grid Cloth, 216, Heavy Frost

Medium Diffusion:
Silk, Spun, 250, Light Grid

Light Diffusion:
Opal, Hampshire Frost, 251, 252

LIGHT LOSS FOR COLOR CORRECTION GEL:

CTB (Color Temperature Blue) "201": 1 2/3 stops
1/2 CTB "202": 1 stop
1/4 CTB "203": 2/3 stop
1/8 CTB "218": 1/3 stop

CTO (Color Temperature Orange) "204": 1 stop
1/2 CTO "205": 2/3 stop
1/4 CTO "206": 1/3 stop
1/8 CTO "223": 1/3 stop

CTS (Color Temperature Straw) "441": 1 stop
1/2 CTS "442": 2/3 stop
1/4 CTS "443": 1/3 stop
1/8 CTS "444": 1/3 stop

Plusgreen: 1/2 stop
1/2 Plusgreen: 1/4 stop
1/4 Plusgreen: 1/8 stop
1/8 Plusgreen: 1/8 stop

Minusgreen: 1 stop
1/2 Minusgreen: 1/2 stop
1/4 Minusgreen: 1/4 stop
1/8 Minusgreen: 1/4 stop

MIRED SHIFTS FOR COLOR CORRECTION GEL:

MIRED's are used for calculating color temperature conversions. The math always gets lost in my head so I often use Lee's online MIRED calculator >>>

Here's a link to Rosco's Filter Facts PDF that has a good explanation of the Mired Formula and how to use it >>>

TO INCREASE KELVIN:
CTB  (Color Temperature Blue)-131 MIRED (Converts 3200k to 5500k or 2900k to 5200k)
1/2 CTB -68 MIRED (Converts 3200k to 4100k or 2900k to 3800k)
1/4 CTB -30 MIRED (Converts 3200k to 3500k or 2900k to 3200k)
1/8 CTB -12 MIRED (Converts 3200k to 3300k or 2900k to 3000k)

TO DECREASE KELVIN:
CTO (Color Temperature Orange) +167 MIRED (Converts 6500k to 3200k or 5500k to 2900k)
1/2 CTO +81 MIRED (Converts 5500k to 3800k)
1/4 CTO +42 MIRED (Converts 5500k to 4500k)
1/8 CTO  +20 MIRED (Converts 5500k to 4900k)

CTS (Color Temperature Straw) +160 MIRED (Converts 5500k to 3200k)
1/2 CTS +81 MIRED (Converts 5500k to 3800k)
1/4 CTS +42 MIRED (Converts 5500k to 4500k)
1/8 CTS +20 MIRED (Converts 5500k to 4900k)