

Alexa Log C - Workflow Options
/Alexa Log C - Workflow Options
This post is intended to be a work in progress so I'll be adding more information over time as workflows evolve. I'm intentionally leaving some of this open ended because I'd like anyone reading this who can speak to the topic to help me flesh this out. If you have something to add, please shoot me an email.
These past few months, it's been all about the Alexa. Now that there's a healthy amount of them in the rental market, they're popping up all over the place. I can't speak for other people but for me, all of the jobs that would have been RED three months ago are now Alexa. What happened?
First of all, the images are just stunning. In my opinion, for now, the Alexa is the digital option that really stands up to motion picture film. Just like color negative, there's no harsh and sudden clip in the white, instead the highlights gently and elegantly roll off. There's tons of picture information in the shadows and the noise signature looks more like pleasing film grain than crummy video gain. The color response is faithful and natural. And it's unbelievably simple to work with. Arri really has done an excellent job with this camera and commercial production has been quick to embrace it.
There's a lot of discussion out there as to the best way to work with it - Log C, Rec709, and as of a few days ago, Arri Raw. So what's to be gained by shooting in Log C over Rec709? Really the answer to that question very much depends on how much time and money is available for post production. The out of the box Rec709 video on the Alexa actually looks very good and has ample dynamic range so if there's no time/money for a grade, then the WYSIWYG video is certainly a viable option. The fact is though that Log images encoded to a high quality RGB recorder are always going to give you far more flexibility in the online suite. And now with 2k Arri Raw there's even more flexibility and more resolution than the current 1920x1080 raster. As this newest option is only now available and I haven't worked with it yet, I can't speak to it in this blog post. Instead I'll just be listing a few options for live color correction of the camera's Log C video output.
Unless you have a lot of experience with Log space, it can be difficult to evaluate exposure because there is very little contrast in these images. The nice thing about Log though is that it's a conservative format and bad exposures are actually pretty forgiving. Within reason (more on that later). But you still need to ensure an overall baseline for consistency and continuity. To do this, savvy productions would use some form of viewing LUT (Lookup Table) or in other words, a color space transformation of the Log stream to non-destructively put it into a more normal range of contrast and color saturation.
I really like this simple definition of a LUT that my friend Adrian Jebef came up with -
"..a LUT (Lookup Table), in image processing, is used to transform input data into a more desirable output format. Turn X to Y. Grey to Black. Or Grey to White."
And that's it in a nutshell. To really get into the meat and potatoes of color space transformations is way beyond the scope of this post so if you're looking for more information, Steve Shaw ofLight Illusion published some articles on the topic that answer a lot of questions.
Technical Papers (the DI guide is particularly useful)
Using a LUT on-set not only makes evaluating exposures easier but it also makes the production feel much better about what they're shooting. Who wouldn't rather look at a colorful, contrasty image than a flat, murky one? To me this is kind of a no brainer - which would you rather the agency see -
this?

or this?

Lookup Table's can range from simple "one light" 1D's to complex 3D's involving multiple secondary grades. And they can serve many purposes both on-set and in post but in my experience, there's no such thing as a one size fits all LUT. Every scene and lighting situation is going to be a little different and require some adjustment. After you've established your exposure baseline, you needn't make extreme changes but I've found that most shots require a little LUT tweaking here and there. That means that if you think you can get away with one simple LUT for the whole show, that's not really the case. Even a simple "DeLog" LUT that's intended to mildly normalize contrast and saturation can be too extreme in low light situations and too weak for high contrast exteriors. Doing a live color correct on the Log output has the added advantage of it now being very cheap and easy to record the corrected images to a small solid state device like the Ki Pro or Nano Flash. In this scenario, the production walks away with dailies that reflect the intentions of the DP, can be dropped into their edit without transcoding, and with matching timecode can be used to seamlessly return to the Log images for finishing. Everyone wins with this workflow.
Here's something else that's suddenly entered the picture even as I'm writing this - Arri's LUT Generator.

The LUT Gen can pump out LUT's for a variety of uses such as on-set DeLog, LUT's for Dailies, and for multiple devices such as Cine-tal monitors, Truelight box, HDLink Pro, Sony SRW-1 deck, etc. This is very a rudimentary tool though and lacks any ability to fine tune. I used it to generate their basic 1D DeLog LUT for HDLink Pro and it's the exact same look as when you're in Log C on the camera and you switch the Monitor output to Rec709 - a little bump up in contrast and saturation. To be honest, it doesn't look so great. I also tried a 3D LUT for Apple Color and I kind of feel like most colorists would prefer to just do their own work rather than use some cookie cutter preset like this. These "auto LUT's" could be useful for quickly baking a look for dailies but again, I would prefer to use LUT's that were generated on-set for this purpose because those images will be a far better representation of the production's intentions.
As for the on-set LUT's from the Arri LUT Gen, it can't yet make a file that can be uploaded to the camera. According to Arri's release notes, the camera does not yet support the ability to upload "Looks" to it via SD Card anyways. I believe eventually this functionality will be present and you'll be able to jog through any number of LUT's you've created, one of which will probably get you about where you want to be in terms of luma and color response. Once that's implemented I imagine that will be a far more common way of monitoring Log C on-set.
Until that happens, here are a few other ways of doing it -
HDLink Pro + LinkColor

Blackmagic Design's HDLink Pro $475, LinkColor software $500. This is by far the most cost effective way to do on-set color correction and LUT generation. All you have to do is intercept the HD SDI signal to the HDLink Pro and then use the software's intuitive sliders to paint the image. Total price $975 excluding the host computer.
What I Like -
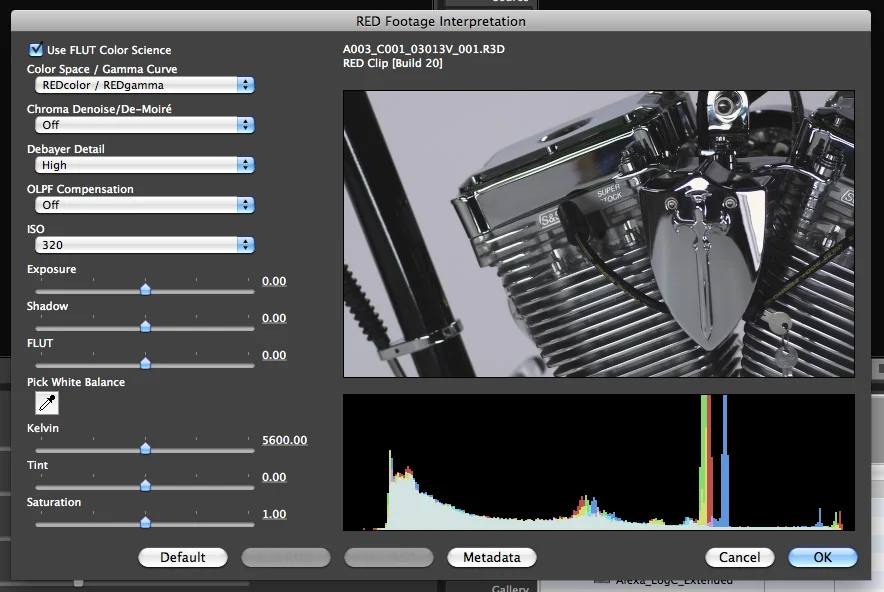
-The ability to load a Pre-LUT or DeLog. With this you create your baseline level of contrast and saturation and from there it's just a matter of making little tweaks as needed. This way you always have a place to start and return to when necessary. I make my DeLog LUT using a DSC Labs Chroma du Monde chart in the light that's being used for the scene. This way you always know where you've placed black, the middle gray crossover point, and white so you have an objective range of values to base exposure on.

-Global Presets - It's so easy to recall and keep track of your work with these. It's also great for flicking through Looks with the DP.

-Bypass Button - With the click of a button, you can turn the LUT you've created on and off. Very handy for evaluating the Log image against your correction.
-User Matrix - This is a great feature that isn't present in other on-set color correction tools. This works just like the linear matrix in a traditional video camera with its 6 variables to modify color response R-B, R-G, G-R, G-B, B-R, and B-G. This ties in nicely to the DeLog functionality because when you have your chart up and setting contrast and overall saturation you can also push the colors around to create the desired response with this matrix toolset. This feature is for 3D LUT output only and is not compliant to the ASC-CDL which only allows RGB Lift, Gamma, Gain, and Saturation.

-For now, LinkColor can export 3D Cubes for HDLink Pro, Truelight .cub files, ASC-CDL, Apple Color, and a .lcg which seems to be proprietary to LinkColor and can be used to import a previous LUT into the software. I've heard that more export options are on the way.
I'm a big fan of LinkColor because of its speed, utility, and price. Also because it's built around inexpensive hardware, it's nice that there can be a HDLink Pro on the other end at post and all they have to do is load my LUT's and they're looking at the exact same thing we were on-set. Takes a lot of the variables out of the equation.
Gamma & Density's 3cP + Matrox MXO2 + HDLink Pro

This is another on-set color correction option I've been using lately. The software is $1500 for the "SF" version which is professional but excluding support for the LUTher box and Panavision GDP. This is the version I have and for my needs, it's worked out nicely. The Matrox MX02 LE In/Out Box is about $1400 and allows for 3cP to ingest the incoming HD SDI video. The $475 HDLink Pro then allows you to upload the LUT's you build in the software to transform the Log signal. Of course a MacBook Pro or Mac Tower is also requisite but the price tag on the components alone is about $3375 so again, a realtively cost effective way of building a workflow.
Check out this video outlne of the process >>>
What I like -
-3cP is a very powerful tool for color management. It's fully compliant to the ASC-CDL which is the de-facto standard in communicating grading decisions between set and post. The software scopes are extremely accurate and the tool set is easy to use and allows for a fair degree of fine tuning.
-The ability to interface with so many different hardware devices - Matrox MXO, RED Rocket, HDLink Pro, Truelight, Cine-tal, and with the more expensive version LUTher and Panavision GDP.
-It can export a good variety of LUT formats for various platforms - Nucoda, Pogle, Truelight, HDLink Pro, Scratch, Apple Color, Technicolor DP Lights, ASC-CDL, etc.
-The automated data management tools are excellent.
-Monitor calibration and profile building tools.
-Dailies Generation for FCP, Avid, and Apple devices such as iPhone and iPad.
-Tiff and DPX image sequence generation.
-Great support for RED R3D file import and export. I actually prefer the R3D grading tools in 3cP to RedCine-X.
One of 3cP's big objectives is to close the communication gap between set and post and they've added a lot of functionality to eliminate the potential. It can generate these reports (below) that accompany the original media so that post production knows exactly what the DP intended. The objective watermark stamp that accompanies corrected images adds further assurance that what you're seeing is what he/she had in mind. I'd say they've made a pretty bullet prooof system.

The only thing I'm not too crazy about is I've found the communication between the software and the external hardware to be a little buggy. Maybe it's just my system though. I'm on a MacBook Pro that's about 3 years old. Long overdue for an upgrade. If you stay in the software you're fine but if you're switching between a lot of different applications I've occasionally lost the link between 3cP and the Matrox. Also, a better set of Look Management tools ala' LinkColor or SpeedGrade would be fantastic. The ability to store and quickly recall looks is incredibly useful and is sorely missing in 3cP.
It's really a fairly expansive software and I'm just glossing the surface of what it can do so for a more in-depth description of functionality, please refer to Gamma & Density's site.
Cine-Tal Monitor + SpeedGrade OnSet
Cine-tal owners swear by them. I've used them a handful of times as a rental item and it's definitely a fantastic display but I don't have enough experience with it really to speak to this popular workflow option. If anyone reading this would like to share some thoughts on this, please email me.
Technicolor's DP Lights System
"DP Lights™ is an exclusive Technicolor system which can be deployed as a pre-visualization, on-location color correction tool, or used in a unique configuration to drive high quality rear screen projection.
In support of 2D or 3D digital capture, the system enables real-time creation of pre-visualization looks during commercial production. Because the system is fully ASC-CDL compliant, looks established on location flow downstream to any Technicolor dailies facility for dailies mastering and use in the DI Suite. For commercial productions ultimately intended for film distribution, the DP Lights™ system includes integration of on-location film print emulation. It is also possible to record a color-corrected feed during digital capture to a format such as XDCAM -- which is supported by Technicolor’s Dailies on Demand playback server -- or to other formats such as HDCAM."
Filmlight's Truelight System
"Truelight is the world’s only complete film colour management system for pre-visualising film images on electronic display devices. Truelight enables artists, colourists, cinematographers and directors to review, accurately, the final look of the film at any point in the digital post-production process – reducing film-outs, matching and rework, and saving valuable time.
Truelight’s success lies in its innovative, measurement-based process to generate 3D transforms (known as cubes or LUTs) that convert specific colour spaces. And, unlike desktop publishing or broadcast video devices, the Truelight Monitor and Projector Probes are purpose-built instruments for characterising high-contrast motion picture displays.
As a result, a correctly calibrated Truelight system is able to compensate for any variable in the post-production workflow, such as differing lab processes, film stocks and displays, and generate a preview that is identical to the final print or Digital Cinema Distribution Master (DCDM)."
Earlier I mentioned that Log exposures are pretty forgiving. Just how forgiving though? I was curious so I did some chart exposures with a skin tone and then DeLogged them into a Rec709 look.
This was my process:
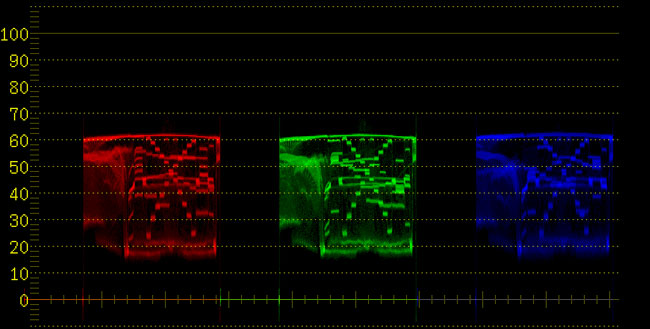
I put the camera into 709 gamma and exposed the grayscale crossover on the chart at 55 IRE. They say you should do this at 60 but that always looks a little bright to my eye so I usually do it around 50 or 55. The brightest part on my pasty, white hand hit just under 70 IRE which is fine for this exposure. For the purposes of the test we'll call it an "ideal exposure".
I then switched the gamma mode to Log C and kept the exposure the same noting that the middle gray swatches hit around 40 IRE which is Arri's recommendation in their Log C specs. When going from Rec709 to Log C, I've noticed that the crossover point on the chart always drops about 10 IRE, Black lifts up to 20 IRE and white hits somewhere in between 60 and 70 IRE. This 20-70 zone seems to be the sweet spot for Log images.
Next I dropped 3 stops on the lens.
After that I opened up 4 stops from my original key light exposure.
Now in Apple Color I loaded these 4 files - Rec709, Ideal Log C, Underexposed, and Overexposed and matched the waveforms and vectorscope of the Log images to the Rec709 exposure.
Here are the results.
Alexa Log C - DeLog Tests - Over and Under Exposure Correction from Ben Cain / Negative Spaces on Vimeo.
Note the Optimum Log C exposure that's been been DeLogged is super clean and with smooth and subtle gradiations. I actually think that Log C images that have been linearized like this look much better than their Rec709 origin counterparts.
The under and overexposed images are salvageable but notice how much noise there is the dark tones on the underexposed image. Look at the shadows on the skin and you can see that there just isn't enough picture information there to smoothly render the tones.
Something strange happened in the overexposed image, it looks very thin and stretched. It's also noticeably softer. When you smash pixels too far one way or the other in this format you just don't have as much separation and while it is salvageable, it's certainly less than ideal.
Keep in mind that these images were recorded in an early build of the camera when ProRes 4444 wasn't yet available so these were 422 HQ. I'm curious as to how much better these DeLogs would have looked if recorded to higher quality encoder.
The wonderful thing about shrinking video down to web size is that it hides a lot of nasty problems - as is the case with the video above. It's a little hard to evaluate what really happening with this small picture so here is the original full res media file for you to evaluate >>>
If anyone wants to play around with these files, they're available for download here >>>
That's all I've got on this one.


 © 2021 Bennett Cain / All Rights Reserved /